Friday, June 21, 2013


my new mini 
_20130610_194705
here she is folks... 
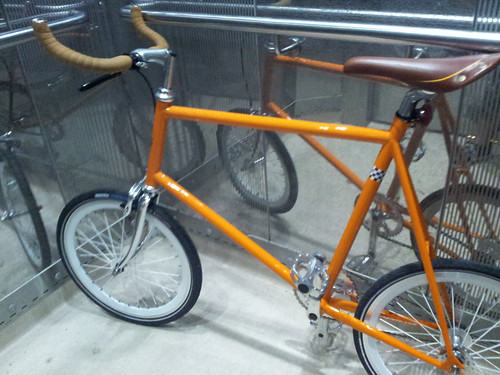
my new (old) mini velo. it's a RH+O... that's what it says on the checkered sticker on the seat stay anyways.

purchased her 2nd hand and did a flip & chop thingee on the drop bars, also managed to reuse the bar tape as well. not bad for a first attempt at installing bar tape, just goes to show, with YOUTUBE, you can learn to do anything! i am the proof.
added a tekro long reach front caliper as well cuz the bike came fix-geard, tried that once... didn't like it so flipped the flip-flop hub over and added a dicta freewheel... much better for my old bones.

been a while since i commuted such a distance (cecil street to fernvale) so i told myself to take it slow. wife didn't think i had it in me to survive the journey but i made it home... in one piece too.... note to self: make bicycle purchases closer to home.

above picture shows the bike in the lift, against the lift wall with room to spare hence no need to do a "angle job" which i know pisses off the other fellow tenants... especially at the end of a long day at work.

this is actually my second mini velo since my KHS foldie. the first being a MASI (see below) which i bought brand new from GPbikes. yes...hot pink! 
 Untitled sadly, it was a waste of a good bike on me as it never saw the action it should.. knowhatimean? so i sold it off. she's with a good owner now.

the adds-ons/mods have already started.
below is a picture of the porteur rack that i designed based on some pictures i found on flickr, did some minor tweaks to the design and had a good friend of mine make it for me.
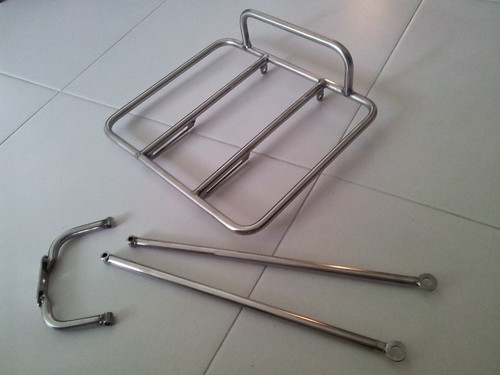
erm...  tad over-built perhaps.....20130613_18132720130613_181324

it's a rough version made from what was available just so i can fine tune it for the final design but apparently the rod diameter i chose was way off, it was too large, it's way over-built and super heavy! (that's 12mm solid stainless steel there) 
but i do love it when something i designed comes to life... thanks for your help Aloysius! 
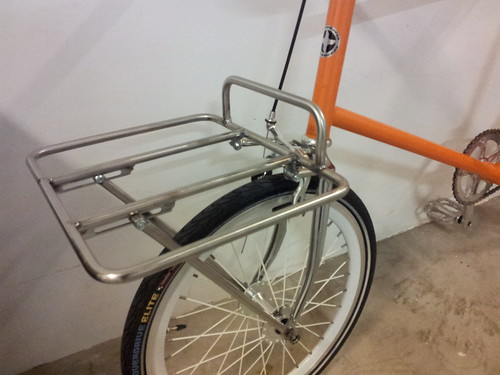
porteur rack for my small wheeled bike_ 20130613_200709


Friday, May 31, 2013

next steps

its been a long time since my last post... i have since moved into an apartment where space is a premium. so much so that the only space i can store "one" bicycle is in the storeroom. having said that, i have owned a KHS foldie before and although it was a great bike...i wore that one out really quickly with my daily commutes to work some 16clicks away (one way) so i offloaded it to some guy who wanted the foldie just for the frame.

doubt i will get another foldie for commuting.. the creaks and flexing really did not inspire any confidence at all.... just cause i prolly weigh too much for any foldie to handle comfortably and not because of build quality issues.

solution, a mini velo.... rides well, has strong 20 inch wheels, no creaks and squeaks, fits into the HDB lift & storeroom at my in-laws, blends into the office environment so i don't need to park it outside where it will get nicked. only drawback is the fact that i look like a circus bear on his tiny bicycle.

Wednesday, May 6, 2009

All that's left to do are some ODDS and ENDS....


here's hoping it doesn't END up looking ODD!

things to do:
  1. rear light...
  2. upholstery for the rumble seat?..


Finally finished off the bed and got it mounted.

looks like a regular truck bed from the side..


pan upwards and you'll see something else


storage space!!!.... all truck beds gotta have storage space!


TA DAH!!!!
.... a rumble seat thrown into the design, just so the little ones can ride shotgun with their old man.... one at a time of course, there IS a load rating for the seat ya know... haha


Monday, April 27, 2009

Painted in some details....


really bad job done.... hai! painting with household paints sucks man!
painting with old leftover household paints REALLY sucks! 

that's what i get for being cheap....

...........wonder if i can take the shine out of the paint???.... hmmmm


Sunday, April 26, 2009

Got it painted...


managed to paint on the light blue base coat last friday...
and today after some masking, i rattle-canned the scallops on... came out ok i guess...
still needs some details though.

Chopped the bed up a little more....


removed some "HEAVINESS" from the bed.... bottom got raised in the process...

Monday, March 23, 2009

Truck bed - TAKE 2!.....Action!!!

well, after seeing Big Al's great looking trike (over at ratrodbikes) with the radio flyer wagon out back, i just felt compelled to try the truck bed idea just one more time!
so i tore down what was left of the first attempt (ikea rack) and decided to build it low into the frame this time instead of being perched high above the rear axle.
this meant more in-depth thought this time as the bed had to clear the fore, aft and above the rear axle parts. also needs a rumble seat built in as my kids would wanna ride shotgun from time to time.... what you see below is what i've managed to come up with so far. i will prolly trim it further. looking into a suitable paint scheme as well.


Tuesday, January 13, 2009

these couple of pics will have to do...

till i take proper outdoor shots this weekend...


finished!...erm.. at least i think it's finished??!!!

got the decals back from Andy just after the new year, oh btw if you happen to be reading this.... HAPPY NEW YEAR!!! 

had the decals applied in my kitchen, with soapy water and an old credit card as a squeegee.... hmph.... let's just say i've done better applications before... haha.

here's what it looky like all mounted up on my trike!


oh, forgot to mention,.... i mounted up a  SPARCO gear shift knob from my old car! (knew it come in handy when i removed it just before sending my car to the scrap yard. 

Monday, December 22, 2008

thinking of selling these off....

anyone here in SG interested? drop me a mail at ohchusan@gmail.com
these were hardly used before i swapped these out with my current 24" rims, so the condition is as good as brand new. SG$200

got these exchanged for a set of 24" 140 spokes instead.... so long as i can mount up my 24x3 white tires i got from Mauz sometime back hyuk hyuk!!!

looks like my trike's gonna be completed real soon...

did some graphics for the "tanks" and had my printer friend produce it for me on reversed print decal.... should get the prints back today... quite excited i must say...

wonder if it'll turn out ok though.. 

Tuesday, October 28, 2008

all mounted... not too shabby eh?


here's what it looks like on the trike..


seen here keyed inside the strut to prevent rotation. while the thumb screw works just by hand tightening, i'm taking no chances and torqued down a little with an allen wrench..

got off my lazy @$$.... finally!


spent some time on my home mill and lathe and came up with these... the raised rectangle portion is keyed for the slot in the fork strut, allows some height adjustability (yep, don't really need it but hey... might as well right? haha)

the old brackets


some may be able to spot that my old brackets (seen above) actually came off a 1/8 nitro engine mount, cut in half with the rough edges filed down. this of course was a temp measure until i got off my lazy @$$ to actually fab something up.

Monday, October 20, 2008

lights install... finally some progress on my trike..

got a couple of real old lights from a real old bicycle store. real bulbs in there.. no LEDs, yes that old. haha.

gonna wire up these to some RC packs i have that are collecting dust, so they might as well serve some purpose. i have some ideas on how to install the packs onto the trike, but i'll have to wait and see what works out. 

Friday, July 4, 2008

night time photos


here's a night time shot... as you can see, photography is not my strong point. hahaha.

Sunday, June 29, 2008

CABLE ROUTING

been wanting to get some nice cable clamps for the trike as zipties just won't do it justice.

so been messing with my home lathe recently and i came up with this... really diggin the look and feel but this will only work in certain circumstances...

Monday, June 23, 2008

here's the shifter mounted on my trike. not a very good picture but you get the idea. had some issues with where to mount it cause most other places, my arms would not be able to shift the shifter! short man, short arms mah!

anywez, since the tube where i finally mounted the shifter is smaller than the clamp, i lathed out a delrin spacer to take up the slack, tried to use the old "inner tube wrap around the tube trick" but it was too ugly for my liking....

also relocating the brake lever to the left of the handle bar just in case i need to stop in a hurry while i happen to be shifting gears seemed only natural.

i'm still having issues with the rear box/chair though... just looks wrong to me...